sbs featured

How to: Create stylish storage with PlastiKote spray paint

You can never have enough storage and baskets are a great way of keeping things tidy! These inexpensive Ikea baskets can be used for a whole host of storage solutions and, with the help of PlastiKote spray paint, look good too!

sbs all baskets in body

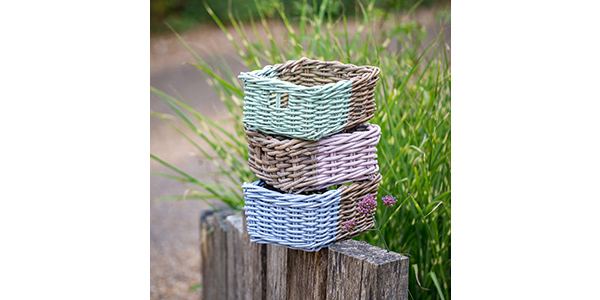
Using pretty heritage colours from the PlastiKote Chalk range – Frost Blue, Pale Rose and Pastel Green – we sprayed three baskets, choosing to paint one half of each basket to keep a rustic feel.

 sbs green basket in body

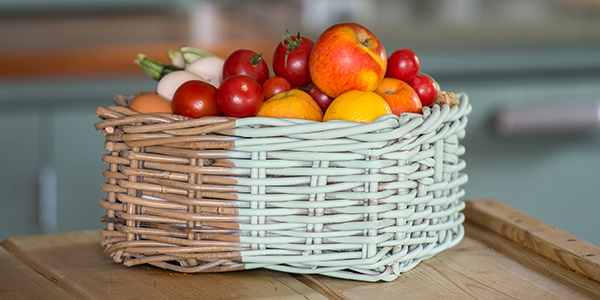
The Pastel Green basket found its way to the kitchen. It works well (and looks great!) as storage for fruit and veg on the counter top.

sbs blue basket in body

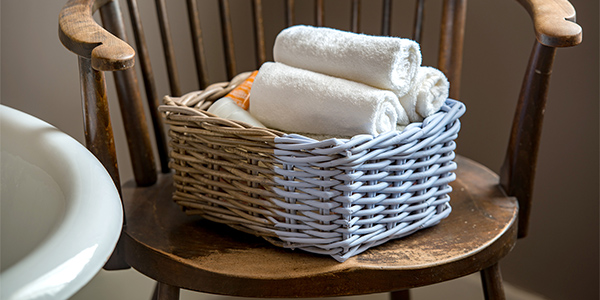
A useful addition to the bathroom, the Frost Blue basket holds toiletries and cloths for overnight guests.

 sbs pink basket in body

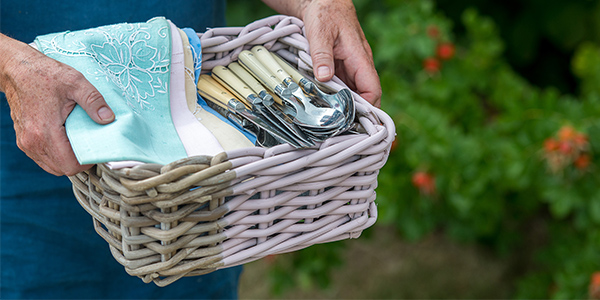
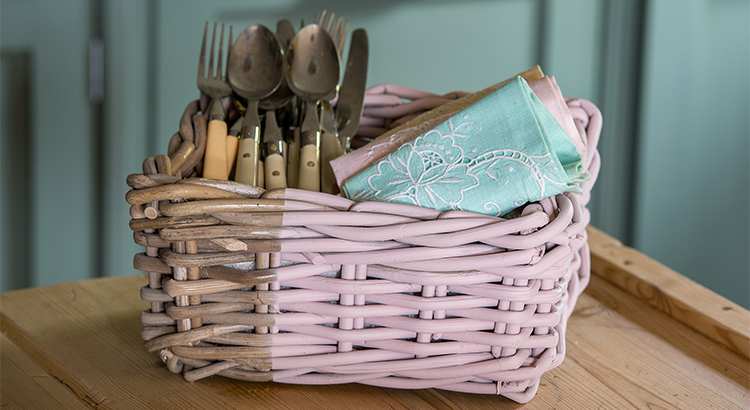
A handy container to take cutlery and napkins out on a sunny summer’s evening for dining al fresco, the Pale Rose basket has yet to find a permanent home (though thinking it may work well in the bedroom to hold hairbrushes and straighteners…).

Are you inspired? It’s as easy as 1, 2, 3!

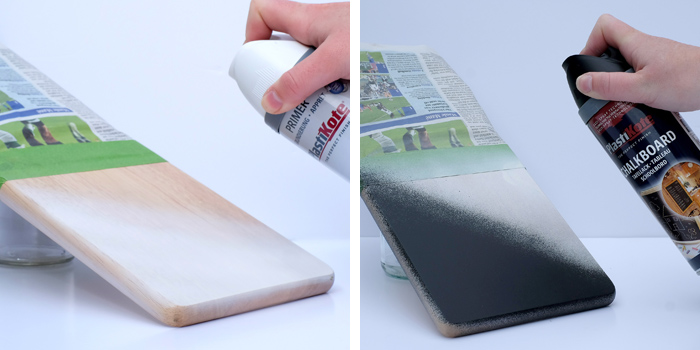
  1. Make sure the basket is clean and dry.
  2. Use Chalk spray paint in the colour of your choice, following instructions on the can.
  3. Allow to thoroughly dry before putting into use.

If you do spray your own baskets, do tag us on Instagram #plastikoteuk or send in via email info@spraypaintideas.co.uk – we’d love to see them.

For more interior projects, check out our Pinterest page.

Read More

sbs blog featured 2

How to: garden furniture makeover with PlastiKote spray paint

Recycle, recycle, recycle! That’s our ethos and this garden furniture set shows that we practise what we preach. The beauty of PlastiKote spray paint is not only can it bring something back to life but if you get bored of the colour or need to change the look, you can do so quickly, easily and inexpensively.

sbs before

This garden table and chairs were inherited nine years ago in a sad and sorry state after many years of use. Using PlastiKote Metal Protekt spray paint in Black, it was brought back to its former glory.

sbs black makeover 1

A couple of years later, the set was sprayed this gorgeous red and moved to become a focal point in a leafy spot in the garden.

Plastikote paints

A house move meant the furniture found a new home on a parterre with a colour scheme of white and green planting. The red was too harsh, so Warm Grey was chosen to tone it down.

sbs warm grey makeover 3

With the introduction of PlastiKote’s NEW Garden spray paint, we couldn’t resist the Surf Green and the table and chairs were sprayed to now sit proudly in their new sunny spot overlooking the lawn.

sbs green makeover

If you’re considering spraying your garden furniture, here are some top tips:

  • Make sure the furniture is clean and dry. Use wire wool or a wire brush to clean off any flakes of rust or old paint. Wash with warm soapy water before allowing to dry thoroughly.
  • If you’re back to bare metal or wood in any area on the furniture, we’d definitely recommend using a PlastiKote Primer – Metal Primer if you have rust spots. Even if you’re just covering old paint, after prepping as above, priming will not only ‘kill’ the colour you’re covering and give you a good surface for the top coat, it will also give you added durability.
  • Follow instructions on the can for the best finish.
  • Allow to thoroughly harden off before using.
  • If possible, put garden furniture in a shed or garage over the winter to protect paint from the harsher weather.

For more garden projects, check out our Garden Glory board on Pinterest.

Read More

Colourful dining featured

How to: create colourful outdoor dining with PlastiKote spray paint

Eating outdoors is one of many pleasures on a sunny summer’s day.  From a family barbecue to an evening supper for two, it’s great to make the effort and lay an enticing table. Here are a couple of  simple ideas using PlastiKote spray paint that are quick and easy to do and won’t cost a fortune. Your summer table will look bright and beautiful!

You will need:

Paper doilies (from Hobbycraft, The Range and other good retailers)

Terracotta plant pot and saucer

Newspaper/dustsheets/cardboard

PlastiKote Fluorescent spray paint

PlastiKote Twist & Spray Primer in White

Paper Doily place mats

How to:

  • In a well-ventilated room or preferably outside, use newspaper or dustsheets to mask the area where you are spray painting.
  • Place the doilies on cardboard to keep them flat.

step by step

  • Apply a couple of fine layers of PlastiKote Fluorescent spray paint following instructions on the can. We chose Fluorescent Pink and Green. Allow 5-10 minutes between coats.
  • The doilies will be touch dry in 30-50 minutes and thoroughly dry in 2-3 hours.
  • You could also use PlastiKote Metallic, Twist & Spray, Chalk or Fast Dry Enamel spray paints for different colours and effects.


Flower pot cutlery or napkin holder

How to:

  • In a well-ventilated room or preferably outside, use newspaper or dustsheets to mask the area where you are spray painting.

spraying the pot

  • Terracotta pots are very porous so it’s recommended to prime the pot and saucer first with PlastiKote Twist & Spray Primer in White, following instructions on the can.
  • When they are thoroughly dry, apply 2-3 layers of PlastiKote Fluorescent spray paint again, following instructions on the can. Allow 5-10 minutes between coats. For this project, we chose Fluorescent Green and Yellow.

colourful pot after

  • Allow to thoroughly dry.
  • Use for napkins, cutlery or line with a napkin and fill with fruit for dessert.

For more easy projects, check out our Mini Makes board on Pinterest.

Read More

Featured pic

How to: create beautiful wedding decorations with PlastiKote spray paint

Whether you’re on a budget or not, it’s lovely to add a personal touch to a wedding. With PlastiKote spray paint and some tin cans and bottles, you can create some pretty table decorations for your special day.

You will need:

Tin cans and bottles

Newspaper/dustsheets

PlastiKote Metallic spray paint

PlastiKote Twist & Spray Colour

How to:

  • Make sure the cans and bottles are clean and dry.


sbs 1

  • In a well-ventilated room or preferably outside, use newspaper or dustsheets to mask the area where you are spray painting.


sbs 2

  • Apply a couple of fine layers of your chosen spray paint, following instructions on the can. We used Metallic Gold, Metallic Copper and Twist & Spray Colour in White Satin.


sbs 3

  • Allow to thoroughly dry.  Fill with your chosen flowers and arrange, in groups or individually, they look stunning!


sbs 4


Here are a couple more ideas on upcycling glass jars using stencils, perfect for decorating a wedding table:


A heart stencil adds a pretty detail - works well as a tea light holder.
A heart stencil adds a pretty detail – works well as a tea light holder.

Spray over a strip of lace to leave a delicate pattern - gorgeous!
Spray over a strip of lace to leave a delicate pattern – gorgeous!


For more ideas, check out our Wedding Inspiration board on Pinterest.

Read More

Featured PlastiKote Garden Colours - Sea View, Azalea, Light Blue

How to: NEW Garden colours from PlastiKote spray paint

Colourful Garden Pots

Introducing NEW Garden colours from PlastiKote spray paint. Available in 10 gorgeous matt colours, it can be used on wood, metal, plastic, stone and wicker, making it ideal for outdoor craft projects as well as furniture, planters and garden ornaments. With a water-based formulation and 90% less solvents, PlastiKote Garden paint is kinder to the home – and to the environment.

This month’s ‘how to’ is a quick and easy project to recycle those plastic pots that nursery plants come in – so much better than adding to landfill.

You will need:

Plastic pots

Dust sheets/newspaper or a garden cane

PlastiKote Garden spray paint

How to:

  • Make sure the pot is clean and dry.


1 - pots and crate before copy


  • Spread newspaper/dust sheets out in a well-ventilated working area or preferably outside. Or you could use our top tip of popping the pot to be sprayed on a garden cane stuck in the ground.

spraying pot

  • Apply a couple of fine layers of Garden spray paint in the colour of your choice, following instructions on the can.
  • Allow to thoroughly dry before potting up and displaying in your garden.

PlastiKote Garden Colours - Sea View, Azalea, Light Blue

For more ideas, check out our Garden Pinterest page.

Read More

How to Plastikote chopping board front cover

How to: Chalkboard chopping board with PlastiKote spray paint

Chalkboard chopping board

Chalkboards are useful additions in the home, none more so than in the kitchen. We’ve made several over the years but this is a cute chopping board makeover using a chopping board from The Range and Chalkboard from PlastiKote spray paint that you can hang up or sit on the kitchen counter to jot down reminders for your shopping list or appointments.

You will need:

Chopping Board (ours is from The Range)

Dust sheets/newspaper

Masking tape

PlastiKote Chalkboard spray paint

PlastiKote Twist & Spray Primer


How to chopping board before


How to:


  • Make sure the board is clean and dry.
  • Spread newspaper/dust sheets out in a well-ventilated working area or preferably outside
  • We recommend priming bare wood because of its porous nature. Following instructions on the can, prime the board with PlastiKote Twist & Spray Primer.


how to step by step


  • When thoroughly dry, apply a couple of layers of PlastiKote Chalkboard spray paint. You can re-coat at anytime.
  • Allow to dry. The board will be touch dry in 2-3 hours but allow 7 days before using chalk on it.


How to Plastikote chopping board interior


Here are a couple of other projects for the kitchen using PlastiKote Chalkboard spray paint.


how to herb and spice pots

These cute spice jars are a great way of using up leftover Chalkboard spray paint.

how to chalkboard placemat

Recycle old place mats with a can of Chalkboard spray paint. Great for place names at a dinner party or keeping the children amused between courses.

For more ideas, check out our Chalkboard Pinterest page here. If you want to find out more about PlastiKote Chalkboard spray paint, go to our website here.

Read More

easter jars front cover pic best

How to: Easter treat jars with PlastiKote spray paints

Easter treat jars

What is nicer than a homemade gift, whether it’s for a Easter, a birthday or just to say you care? These cute little jars made with PlastiKote spray paint could be adapted for any occasion.

You will need:

Glass jar

Small pine drawer knob

Masking tape

PlastiKote Fast Dry Enamel spray paint

Decorative washi tape


easter jars before


How to:

  • Clean the glass jar and lid with soapy water and allow to thoroughly dry.
  • Using a hot glue gun, stick the pine knob to the lid of the jar. Leave to dry.
  • Mask the jar so that you have a strip around the middle to spray.
  • Following instructions on the can, spray the jar and the lid. Two fine layers are better than one thick one.


easter jars 2 and 3


  • Allow to thoroughly dry. The paint will be touch dry in under an hour and thoroughly dry in 2-3 hours.
  • Apply a strip of decorative washi tape to add interest to the jar.
  • Fill with sweet treats for a pretty, personal gift at Easter or anytime.


EAster jars after end of piece


Read More

how to front cover pic

How to: gifts from a heart shaped stencil and PlastiKote spray paint

A handmade gift is always much appreciated and never more so than on February 14th! But don’t just make it on Valentine’s Day – our gifts, from a heart shaped stencil and PlastiKote spray paint are made with love for any day of the year…


heart jars


To make a Valentine’s vase, tealight holder or gift jar, you will need:


Glass jar, bottle, vase

Cardboard with double sided tape OR Large sticky label

PlastiKote spray paint: in our projects we used Stained Glass, Glass Frosting and Metallic Silver


heart jar 4


How to:

  • Make sure the jar, bottle or vase is clean and dry.
  • Draw a heart shape on the cardboard or label and cut out.
  • Stick the heart to the jar.
  • Apply the spray paint following instructions on the can.
  • When dry, carefully remove the heart shape to reveal the clear heart underneath.


heart jar 2

Read More

chalk feature pic

How to: the ultimate chalky finish with PlastiKote Chalk spray paint

Introducing Chalk spray paint, the most recent addition to the PlastiKote spray paint range.

With a flat chalky finish, Chalk spray paint is ideal for recycling old furniture or giving a vintage look to something more modern. There are seven heritage colours to choose from with three more being added in the Spring. You can also find out more about Chalk on the PlastiKote website here.


Chalk colours: Dark Hessian , Old Hessian, Pale Rose, Vintage White, Pastel Green, Frost Blue, Caffe Espresso

Chalk colours: Dark Hessian , Old Hessian, Pale Rose, Vintage White, Pastel Green, Frost Blue, Caffe Espresso


PlastiKote Chalk spray paints small


You can use one colour over another and then gently rub back to reveal both layers. Or spray Chalk over Gold or Silver in the new Leaf spray paints and then lightly rub back to give an aged look.


Leaf spray paint in Gold and Silver

Leaf spray paint in Gold and Silver


Here’s a picture of one of our favourite projects in Chalk – a cabinet sprayed in Pale Rose.


cabinet inside


How to:

  1. Give the cabinet a light sanding to give a good key for the Chalk paint.
  2. Make sure the cabinet is clean and all dust from the sanding is removed by wiping with a damp cloth and allowing to dry,
  3. When completely dry, use Twist & Spray Primer to give a light base coat all over. This will increase coverage, adhesion and durability.
  4. Following the instructions on the can, apply Chalk. It’s really important to shake the can for the stated 3 minutes before spraying to ensure the paint mixes well. We recommend shaking the can regularly throughout the spraying process and particularly in between coats.
  5. The paint will be dry in two to three hours but allow the paint on the cabinet to completely Harden off for 48-72 hour before using.


Here are a few more Chalk projects we’ve been working on over the last few months:


Bathroom caddy in Chalk Frost Blue. Key cabinet in Chalk Vintage White

Bathroom caddy in Chalk Frost Blue. Key cabinet in Chalk Vintage White


Sewing box in Chalk Caffe Espresso. Stool in Chalk Pastel Green

Sewing box in Chalk Caffe Espresso. Stool in Chalk Pastel Green


Read More

Cover. step by step PlastiKote Christmas Leaf Place Setting 22 for FB

How to: stylish Christmas table place settings with PlastiKote spray paint

When your guests arrive for festive food, avoid the confusion and the calls of ‘where shall I sit?’ with some stylish, affordable table place settings. All with a little bit of help from PlastiKote spray paint!

If you have a large amount to do or are spraying other items for Christmas, use 400ml Twist & Spray (T&S) Colour or 400ml Metallic spray paint. For a small amount, a can of Fast Dry Enamel (FDE) 100ml goes a long way and is easily affordable at around £4.

We sprayed a large ivy leaf in Flat White (FDE) and then threaded a luggage label on the stem. Simple, stylish and very effective.


DGSHAKE2


Fruit is another useful resource at Christmas. Choose not quite ripe apples or pears to spray – with a full coat, they will last a good couple of weeks. This pear has been sprayed with FDE Gold Leaf.


step by step pear


Pine cones are easily transformed into place name holders. A light spritz of white (T&S or FDE) makes them look like they’ve been brought in from the snow! A spritz of PlastiKote Glitter spray paint will make them look frosty.


cones step by step


This sycamore leaf looks stunning on a plain white plate. Sprayed with Metallic Copper (T&S or FDE), it has a lovely warm sheen. Use a marker to write the name.


step by step polly leaf


This place setting is one for the kids (big and small!). A sprayed cone with a name card, a festive doily (sprayed in FDE Gold Leaf) and a favours jar. The jar is a recycled sauce jar, cleaned thoroughly, a small wooden ornament hot glued to the lid and the the lid sprayed. T&S Bright Red Gloss was used to achieve this very festive setting.


red cone place setting

Read More