easter makes cover pic

How to: easy Spring projects with PlastiKote spray paint

Add some pretty decorations and accessories to your home this Spring with PlastiKote spray paints. It’s so quick and easy to revamp or upcycle items you already have to make affordable accessories which will look stunning this Spring and beyond.

You will need:

Items to be upcycled – we used tin cans, an old cake stand and a Christmas wreath

Dust sheets/newspaper or a garden cane

PlastiKote  spray paint


EAster egg nest

We used Twist & Spray Leafy Rise to recycle this Christmas wreath into an Easter egg nest


How to:

  • Spread newspaper/dust sheets out in a well-ventilated working area or preferably outside.
  • Make sure the item you are spraying is clean and dry.
  • Following instructions on the can, spray the item with your spray paint of choice.
  • Allow to thoroughly dry before using.


how to tin cans 1

We used Fast Dry Enamel Lavender, Hot Pink and Sky Blue to upcycle these tin cans into plant holders


How to cake stand

We used Twist & Spray Leafy Rise to revamp this cake stand for our cakes


how to tin cans 2

We used Twist & Spray Leafy Rise, Daffodil and Baby Blue to transform these tin cans into planters

Read More

Hobbycraft comp pic

Competition: win a £50 Hobbycraft gift card with PlastiKote spray paint

Win a £50 gift card for Hobbycraft in our April competition with PlastiKote spray paint!

It’s so easy to spray paint a plastic pot and make those store-bought pots look pretty! We’ve sprayed this one in a pink from our Twist & Spray Colour range. But which PlastiKote spray paint pink is it?


It’s so easy to enter this month’s competition.  Just email us your answer, A Pink Burst B Pastel Pink or C Cameo Pink with your contact details to competition@spraypaintideas.co.uk, with APR COMP as the subject.  We’ll pick one lucky winner at random from those who guessed the correct pink after the closing date of 30th April. Good luck!

We run a competition every month, so do sign up to our newsletter to make sure you are in with a chance to win.

Thank you to everyone for entering our March competition and our congratulations to Claire Woods  from Witton, Norwich. Claire chose daffodils as her favourite spring flowers. Great choice!


DAffodiles


For the terms and conditions of our April competition please click here.

Read More

top tip feature pic USE THIS ONE

Top tip: from trash to treasure with PlastiKote spray paint

It can be surprising what some people throw away.  Sometimes because they’ve fallen out of love with it or it doesn’t match a room revamp. Well, their trash could become your treasure! Scour junk shops, boot fairs, even the local tip for things that others have discarded that you could recycle with PlastiKote spray paint – everything from tables and chairs to vases and frames.


from trash to treasure 1


from trash to treasure 2


Read More

reader project feature pic

Reader project: upcycling a bathroom mirror with PlastiKote spray paint

Thank you to Lisa Durkin for sending in this fabulous upcycling project. Lisa’s instagram feed @placeshaperinteriors is full of gorgeous interior design ideas so do head over there and take a look…

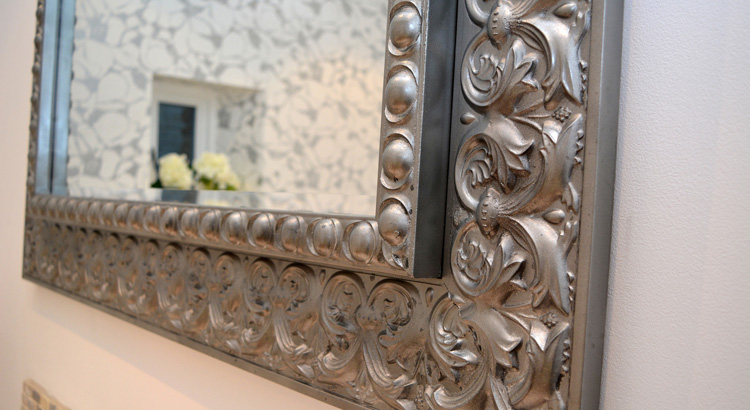
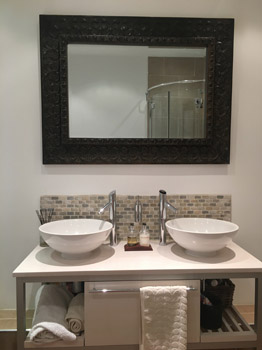
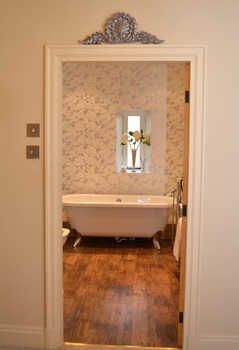
Lisa told us:‘’I love interior design and really enjoying designing and decorating our new home. The bathroom was lovely but I wanted to bring a fresher, modern feel to it. I found a beautiful Silver and White Kelly Hoppen Wallpaper which I chose to feature on the main wall, then I painted the walls, woodwork and ceiling white. But the big, ornate brown mirror didn’t look right with the new colour scheme so I thought about spraying or painting it a Silver or Pewter colour rather than spending money on a new feature mirror.


BathroomMirror_Before_Brown


I found the Plastikote Spray at my local DIY Store and decided to go for the Pewter colour. I must admit I was really nervous about using it as I didn’t want to spoilt the mirror but I knew it was no good to me in the brown colour so I felt I has nothing to lose (except money to buy a new mirror if it didn’t work out!).

The mirror was a Resin material so it didn’t need any preparation other than masking tape on the mirror area. I then took it outside in the garden on the stone driveway and placed the mirror on an old sheet. I wore latex gloves and followed the instructions  – spraying the outer edge of the mirror first in thin coats. I knew after the first few sprays it was going to look good as the coverage and the colour were great and better than I expected.


mirror step by step


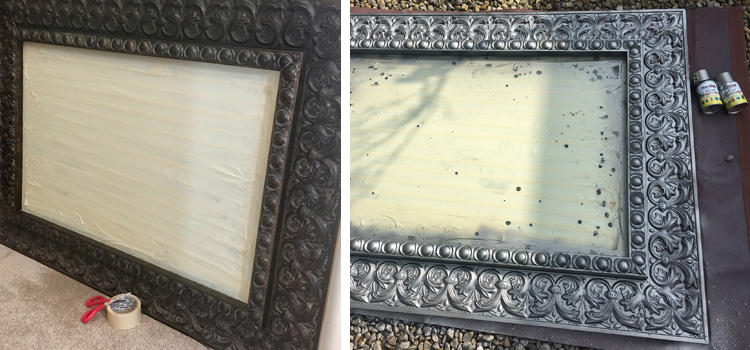
Most of the mirror area I sprayed only needed 1 coat – I just had to go over a few patches that I had missed. I left it outside to finish drying for another 2 hours before I brought it back in the house.


BathroomMakeover after close


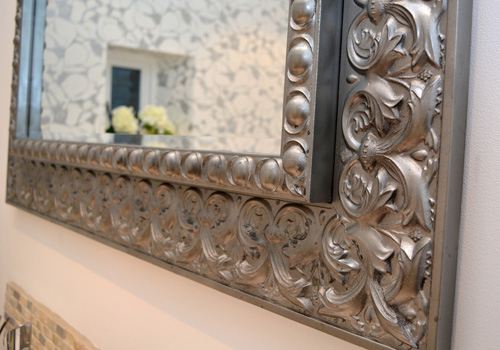
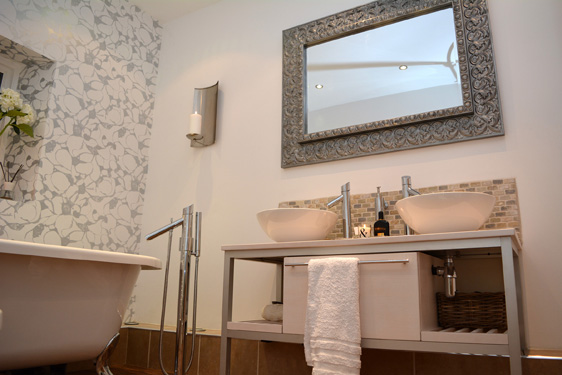
When I put it back up on the wall in the newly decorated bathroom – it looked stunning and really makes the whole bathroom complete. I’m so impressed with how easy and cheap it was to do – this mirror makeover cost me less than £9 and only took an hour to  prepare and spray. I have my eye on a few more projects around the house that I can transform with Plastikote spray paint – so nothing is safe! You get so much more satisfaction when you ‘upcycle’ something and it turns out so good.

The whole mirror used 3 small 100ml cans of Pewter (although I did have some left so I also sprayed a decorative wall plaque above the bathroom door from gold to Pewter).  Everything co-ordinates  now  and it’s saved me lots of money!‘’


BathroomMakeover after


Decorative Plaque 013

Read More